Showing posts with label Home Improvement. Show all posts

Wednesday, December 31, 2014

Thank You, 2014

As we count down the final hours of 2014, some will be happy to see the old year end. For me and for my family, however, 2014 was a very good year. So many positive things happened for us during the past year. We began tackling the repairs and renovations to our home. I started this blog. My husband went back to school to finish his degree. My daughter joined the track and field team, and started learning Spanish.

As for me, I won a coveted spot in the Cherry Blossom 10 Mile race in Washington, DC. We had a fabulous week-long trip to our nation's capitol at the height of the cherry blossom season! I trained all summer for the Rock'n'Roll Half Marathon in Savannah, GA. I look fondly back on all those long runs out in the hot summer sun, and in the warm summer evening air, hoping that their memory will sustain me through the dark and cold of the winter ahead. I ran the half marathon in November and set a PR, then spent several days recovering at on the Tybee Island beach.

I also began my journey down the path of minimalism. This path has not only help me begin rid myself of physical clutter, but I have began to evaluate the mental and emotional clutter in my life as well. I rediscovered the things that are important to me, and I let go of the things that were dragging me down. There is still so much more work to be down, but I am wholeheartedly looking forward to it.

Some of my favorite minimalist blogs from 2014 were:
Becoming Minimalistby Joshua Becker
Be More With Lessby Courtney Carver
Rowdy Kittensby Tammy Strobel
Slow Your Homeby Brooke McAlary

So with 2015 only a few hours away, I have been pondering my New Year's Resolutions. I am not sure what resolutions I am going to embrace yet, but for now, I want to say "thank you" to 2014, for all the wonderful memories and much-need enlightenment. Thank you, 2014!

And here of some of my favorite memories from 2014:

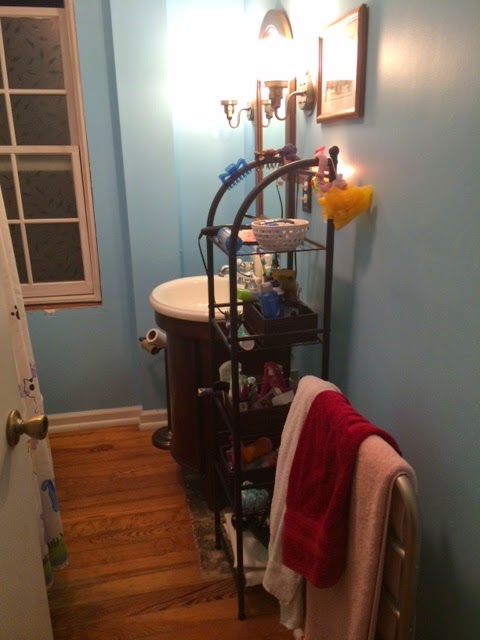
New lights in the bathroom!


Sunrise on the National Mall for the Cherry Blossom 10 Mile Race


Cherry blossoms


Japanese girls amongst the cherry blossoms


Way out in front in the 1600m


My Blue Heaven - now with added BLUE


No more leaking bathroom pipes above the living room!


New water heater


Simon and the summer roses


RC Cola Moon Pie 10-Miler, in and around Bell Buckle, TN


Beautiful Isabella


Friends on a summer run


A summer evening run in the village


Sunset in the village


Simon!


An early autumn rainstorm brings parking lot canoeing!


Glorious fall!


Fifi, our year-round Halloween kitty


Autumn sunset


Jack-o'-lantern


The Half Marathon


Tybee


Bridget loves the Christmas tree

So Happy New Year, everyone! But as we rush forward to embrace the shiny new year, let's remember 2014 and cherish the memory of a wonderful year.

Wednesday, May 28, 2014

Time To Wake Up And Smell The Fabric Softener

Before we could start painting the house, we had a couple of other emergency tasks that arose: the water heater stopped working, the dryer stopped working, and water from the bath tub supply line in the upstairs bath began to leak about a bucket a day of water through the ceiling into the living room. Last weekend, we tackled fixing the dryer, and got started fixing the leak in the ceiling. But today I am just going to talk about the dryer.

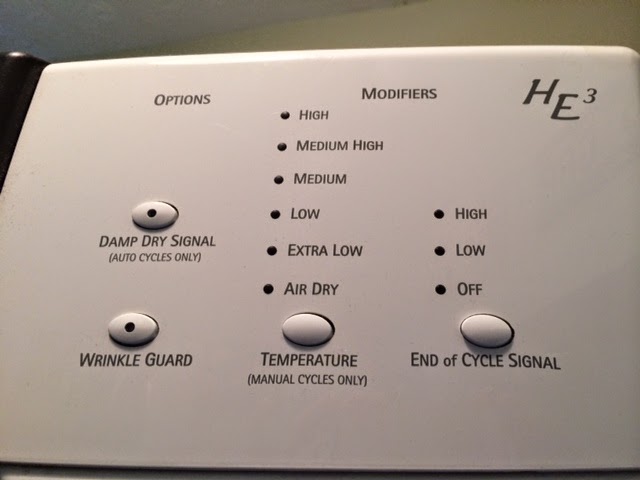
We have a 10-year-old Kenmore Elite HE3 front-loading washer and matching dryer.


Last November, we put in a load of clothes, pressed the button, and nothing happened. The display panel at the top lit, but the dryer would not start turning or drying. The interior light came on, but that was it. We did a little research on the internet and found that this "symptom" is generally caused by a burnt-out thermal fuse. A little more research was required to track down the right part number for our dryer model. Luckily, there are lots of these dryers still around. In our case, the part number was 3392519. We found the fuses on Amazon from McCombs Supply Company in Lancaster, PA. The fuses run about $2.75 a piece, and McCombs provided free, quick shipping. When the fuse installed in November blew a couple of weeks ago, we ordered two more of the same fuse. Side note: I think that the first fuse that we installed blew due to the fact that the dryer vent needed to be cleaned, which has been rectified.

The first thing that we did was unplug the dryer.


Next, we propped the front of the dryer up with a 3" X 3" fence post remnant, so we could better reach the access panel.


Then we removed the two screws on lower corners of the access panel.


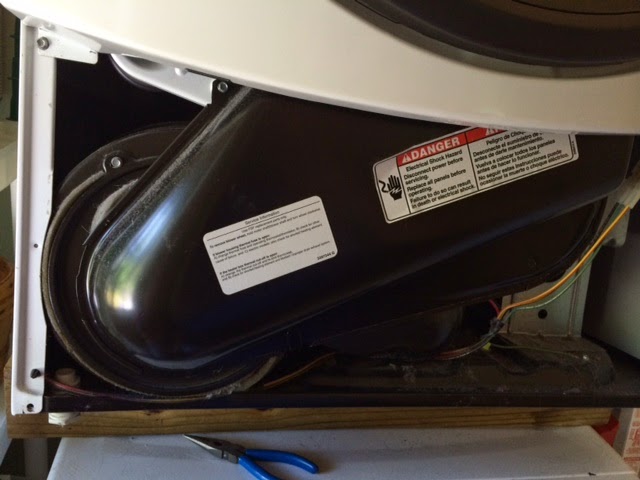
We slid the outer access panel off to reveal the blower wheel housing.


There are three screws that hold the blower wheel housing cover in place - one on the left, seen below at the top:


one on the right:


and one underneath that secures a clip:


We slipped the blower wheel housing off, and cleaned the blower wheel with the vacuum.


The fuse is located above and to the right of the blower wheel.


We loosened the screw that held the fuse in place and slipped it backwards out of the slot.


Then, we slipped the two connectors off the fuse.


We got the new fuse from the package.


We connected the connectors to the new fuse and installed it in the slot.


Then, we tightened the screw that holds the fuse back into place.


We replaced the blower wheel housing, and the access panel, and removed the fence post used to prop up the dryer. Then we plugged the dryer back in and - TADA - it works!

The whole process only took about 45 minutes, and most of that was spent looking for the right size hex wrench.

Tuesday, May 27, 2014

You Know What They Say About The Best Laid Plans ...

As I mentioned in my very first post, we need to paint our house. Once upon a time, it was a lovely dark teal blue. It has since faded to a sort of teal-ish pea green color. Additionally, at some time in the past, before we owned the house, it was barn red. When it was painted teal (a couple of years before we bought it), the painters did not remove shutters. Therefore, the house is still red under the shutters! We had a storm this winter that knocked some slats out the shutters, and there was the red, shining happily through.

We decided that Memorial Day weekend, I would take an extra day off work and we would paint the front of the house. The plan was to do one side every two or three weeks and be done by the end of the summer. Then, we would come back next year and do all the trim. Some of the trim is damaged and needs to be replaced, and the parts that are not damaged are going to require some serious scraping and sanding. Like all the plans that I make regarding the house, this one was WILDLY optimistic.

The entire process involved five steps: 1. Wash the house with "house wash" to create a clean painting surface. 2. Caulk any cracked shingles, gaps around windows, etc. (our house is made of either asbestos cement shingles or Hardie shingles, depending on who you ask). 3. Paint first coat. 4. Paint second coat. 5. High five one another and relax with a beer.

So Saturday morning, Day 1, we hit Home Depot to pick up 2 gallons of Behr Premium Plus Exterior Flat paint in Glacier Lake, paint brushes, drop cloths, house wash, and scrub brushes.

To clean the house, we had originally selected the Simple Green siding wash, but then of course couldn't find it anywhere. So we went with Jomax, which did a good job, but the smell was migraine-inducing. Really. I got a migraine. The house was really dirty so we wanted to actually scrub it, not just spray something on and then rinse it off. The first floor went great. Then we got to the second floor.

Because we have a porch across the entire front of the house, it was necessary to get on the roof of the porch to reach the second story. It quickly became apparent that the pitch of the roof was too much to just set up a ladder and scrub, which was pretty much my plan for that step. Furthermore, the very nice Little Giant ladder that we own was much too heavy and unwieldy for dealing with on a roof. We scratched our head for a while and decided to just scrub the parts that we could reach and mull over the remainder. And the evening and the morning were the first day.

Day 2 arrived. How to reach the top of the second story siding really had us stumped. There was discussion of extensions for cleaning and painting, but standing on the roof, we were still a good 10-12 feet from the the top of the siding. Working at that distance with extensions would be extremely difficult. Plus dealing with the ladder was seriously exhausting for my husband. So at that point, we chose instead to engage in an extensive argument which pretty much killed the rest of the day. We did get around to caulking the first floor at least. Luckily, it was four-day weekend, and we had two days left. And the evening and the morning were the second day.

Day 3. The internet is our friend! We trotted back to Home Depot for some roof brackets, roofing nails, and a couple of 2 x 10s. Then across the street to Lowe's for a Werner Upgear Roofing Safety System. This thing is awesome! The kit includes a safety harness, a rope lifeline, a safety tether, a roof anchor, and the screws to attach the roof anchor. Then off to Sherwin-Williams for the coolest telescoping ladder ever by Xtend & Climb! It extends to 20 ft, but collapses to about 30 inches, and is light enough that even I can lift it. My husband attached the roof anchor to a rafter in the attic and we ran the lifeline through the attic vent down the front of the house. We installed the roof brackets and laid a 2 X 10 across it. The board was slightly tilted towards the house, so it would push on the legs of the ladder, directing it towards the house, substantially reducing the chance of slippage.


You can get an idea of the height from this picture, and it was taken from the window. The board in the picture is an 2 X 8 - we actually used a 2 X 10 as it fit better in the brackets. With everything in place, we were ready to get on the ladder and clean.

I suited up in the safety harness and adjusted all the straps. We climbed out on the roof, I clipped on the safety tether, my husband held the ladder, and up I went.


The trick is to not look down. We rigged up a rope to use as a pulley, so I could pull up the hose for rinsing, as well as change out scrub brushes. Two hours later, the house was all clean. Isabella, sitting on the front porch, approves.


I told you the house was red under the shutters. Hey, at least it kind of matches the door! After scrubbing the house 30 ft up, my legs were pretty Jell-o-y, so we called it a day. And the evening and the morning were the third day.

Day 4. I went to bed with a migraine which didn't go away until about 3 a.m. Completely exhausted, I slept until 11 o'clock. My husband let me sleep, because, as he said, I looked like I was in pain and I needed it. After a late breakfast, we headed out to the front porch, and were able to get the first coat of paint on before picking up our daughter at school. Hurray!


It looks even better in real life. We hope to get the rest done next weekend. It's going to be stunning when the whole house is done.

Friday, May 16, 2014

We Interrupt Our Regularly Schedule Renovations To Bring You ...

Our new garden beds!

We decided to expand our garden beds this year. Here are last year's garden beds as they looked this past winter:


We built these beds three years ago. The boards had deteriorated to the point that they had to be replaced anyway, so we decided to expand.

We created two beds, each 8 ft by 2 ft and 12 inches deep. They are narrow, so we don't have to reach over too far to harvest the vegetables. And we created a third bed, 6 ft by 2 ft by 6 inches deep. This bed is for our kitty, Simon. You remember Simon, right?


Simon is a very large kitty. His head comes up to my knee, and he weighs about 25 lbs. Over the winter, Simon got into the habit of using the empty garden beds as his own private potty patch. We added the third bed, so he would still have a place to ... um ... go, a place not in the vegetable garden. We have taken the additional precaution of putting fence around the veggie gardens. Here is how it looked when we finished up last weekend. My new Ryobi right-angle drill came in very handy while constructing the beds!


We planted tomatoes, jalapeno peppers, spinach, summer squash, zucchini, carrots, cucumbers, onions, pumpkins, and watermelon. And in Simon's Garden, we planted lots of annual seeds, like sunflowers and zinnias. I can't wait until the veggies start coming in, and with the flowers nearby, it will be lovely. I'll post updates throughout the season.